A fresh manicure should not take up your afternoon. With the right method, ten minutes at your kitchen table is enough for press-on nails that look like salon work and stay put for 2 to 3 weeks.
Every HELVA Nails box comes with a printed 10 step guide. This article follows those same ten steps, explains why each one matters, and covers what to do when something does not go to plan.
What is in your kit
- Press-on gel nails in several sizes, decorated by hand
- Adhesive gel stickers
- A small wooden stick for application and removal
- The printed 10 step application guide
No glue, no UV lamp, no drying time. Everything you need is already in the box.
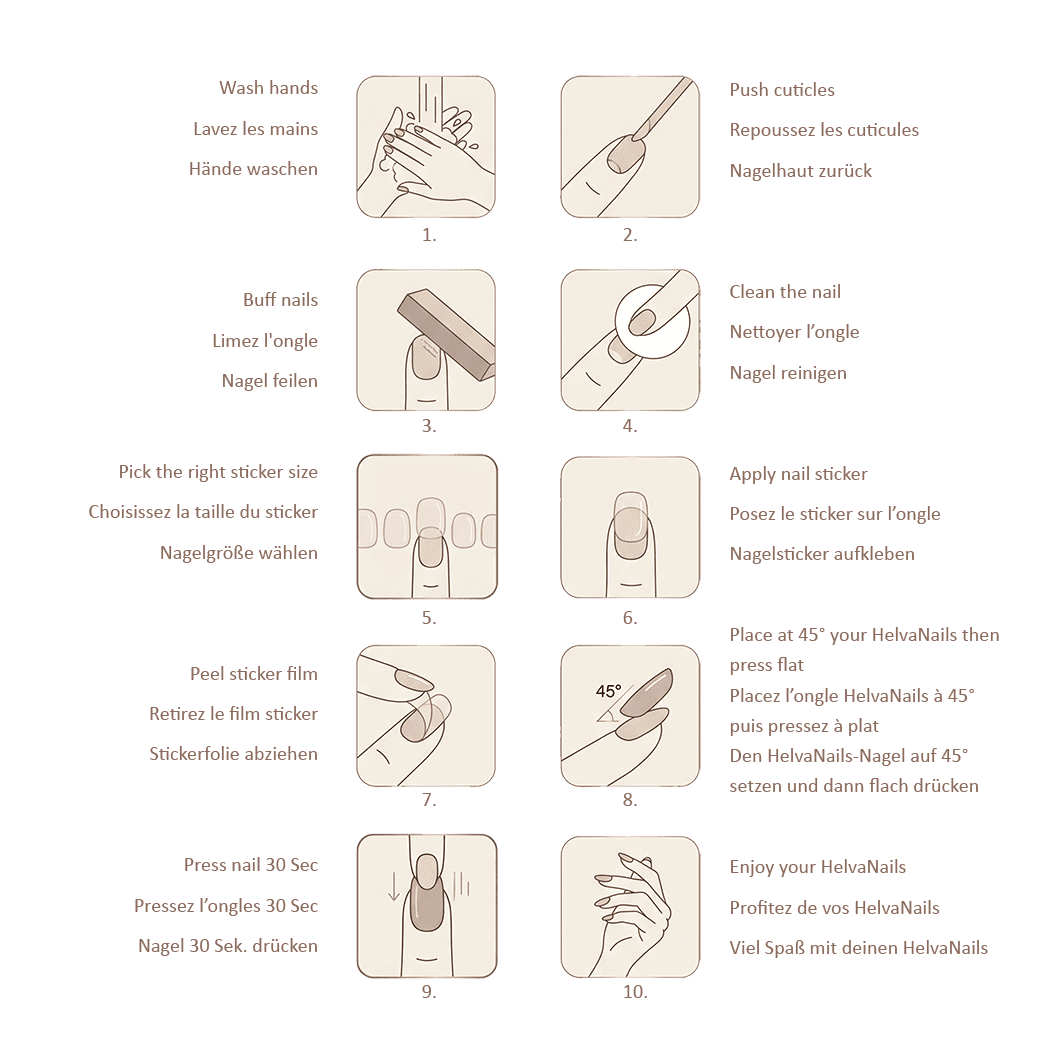
The 10 steps to a manicure that holds
Count about ten minutes the first time, less once you have the habit. The image below is the same guide you will find printed inside your box.
Prepare your nails (steps 1 to 4)
Preparation decides how long your press-on nails will hold. It takes five minutes and it is the part most people rush. Don’t.
1. Wash your hands. Warm water and soap already remove a good part of the natural oils sitting on your nails.
2. Push back your cuticles. Use the wooden stick from your kit and work gently. A clear nail plate gives the sticker more surface to grip and keeps the press-on from lifting at the base.
3. Buff the nail. File the surface lightly until the shine is gone. A slightly matte nail grips far better than a glossy one. Stop there, the goal is texture, not thinning your nail. If your natural nails are long, trimming them short also helps: less leverage, less risk of popping off.
4. Clean the nail. Wipe each nail with a cotton pad and a drop of alcohol, then let it dry. From this point on, keep your fingertips off your nails. One touch is enough to leave oil behind.
Apply the stickers (steps 5 to 7)
5. Pick the right sticker size. The sticker should cover as much of your nail as possible without touching the skin or sticking out past the edges.
6. Apply the sticker to your natural nail. Press it down firmly across the whole surface, then smooth it out with the wooden stick. Air bubbles are the number one cause of early lifting, so chase them out now.
7. Peel off the protective film. Lift it from a corner and avoid touching the adhesive underneath.
Set your HELVA nails (steps 8 to 10)
8. Place the nail at a 45 degree angle. Set the base down first, about one millimeter away from the cuticle, then lower the tip in a rolling motion until the nail sits flat. This angle pushes the air out instead of trapping it.
9. Press for 30 seconds. Press from the center out towards the edges, then hold the tip. Edges and tips are where lifting usually starts, so give them a few extra seconds.
10. Enjoy your HelvaNails. Check each nail from the side. If you spot a bubble, lift that area gently and press again. Then give the adhesive one full hour before showering, washing dishes or taking a long bath.
If a nail lifts or comes off
A nail falls off within a day or two. The natural nail was probably still a little oily, or its surface too glossy. Clean it with alcohol, buff again until matte and start over with a fresh sticker.
You can see air bubbles under the nail. The sticker was not smoothed down enough. Remove the press-on carefully, flatten the sticker with the wooden stick, then press again for 30 seconds.
The edges lift first. The nail or the sticker is slightly too wide, or it touched the cuticle. Keep that one millimeter gap at the base and go one size down if needed.
The nail feels tight. It is a size too small for your nail bed. Switch to the next size up, each kit includes several sizes. Still unsure about your fit? Write to us, we are happy to help you measure.
Removing your nails without damage
Never pull a press-on off dry. That is the one gesture that can genuinely hurt your natural nail.
Fill a bowl with warm soapy water and soak your nails for about ten minutes. Slide the wooden stick gently under the edges as they release. If a nail resists, soak a little longer rather than forcing it.
Once they are off, remove the leftover adhesive, wash the nails with soap and water, dry them well and store them flat in their box. Cared for like this, your HELVA nails can be worn up to 10 times. A drop of cuticle oil on your natural nails afterwards is the perfect finishing touch.
Frequently asked questions
How long do press-on nails last?
2 to 3 weeks with a careful application. The quality of your prep, how often you wash your hands and what you do with them all play a part. Most of our customers easily reach 2 weeks from their very first try.
Do press-on nails damage natural nails?
No. The gel sticker is designed to release without tearing anything off. There is no UV lamp, no aggressive filing of the nail plate and no harsh chemicals involved.
Can I shower and wash my hands normally?
Yes. Give the adhesive one hour to set after application. After that, normal hand washing and showers are no problem. For long dishwashing sessions, gloves will extend the wear.
Do press-on nails work on short nails?
Very well. Preparation matters more than length, and short nails actually give the press-on less leverage, so it tends to hold even better.
How many times can I reuse my HELVA nails?
Up to 10 applications, as long as you remove them with the warm water soak, clean them and store them flat in their box. Use a fresh adhesive sticker for each new application and you are good to go.
Ready for salon nails at home?
Your first HELVA kit starts at CHF 34.90, hand-decorated and delivered free in Switzerland. One box, several applications, and a salon result whenever you want it.